Module: Registry
URL:https://registry.helio365.com/
Overview – What is Registry? #
The Registry module in Helio 365 is the entry point for organizations to enroll into the Helio 365 SaaS platform.
It collects essential organizational, legal, and administrative details to securely onboard a business.
The registration process is divided into 5 guided steps:
- Organisation
- Registration
- Domain
- Admin
- Review
This document covers Step 1 and Step 2 only
2. Accessing the Registry Portal #
- Open your browser and go to:
https://registry.helio365.com/ - You will see the Welcome to Registry! screen.
- The progress bar at the top shows the 5 steps involved.
- By default, the system starts at Step 1 – Organisation.
3. Step 1 – Organisation Details
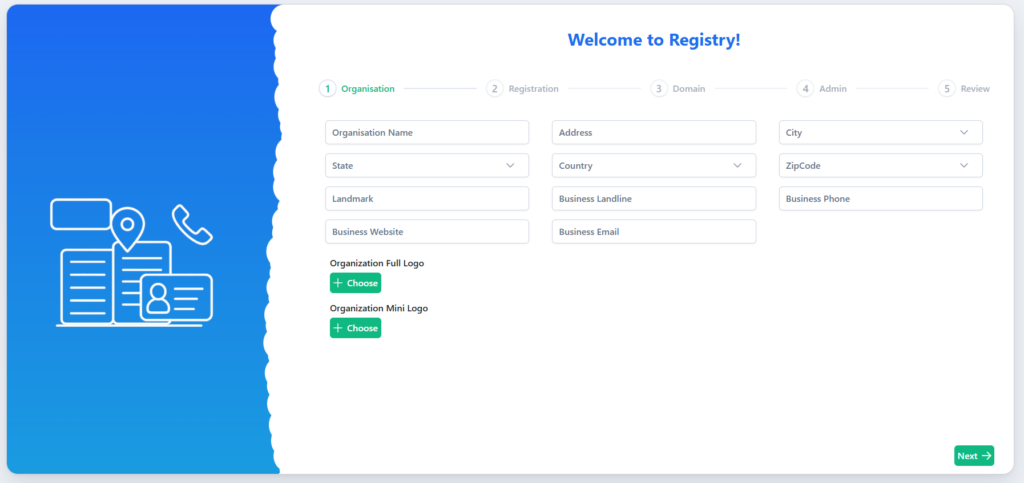
Purpose of this Step #
This step captures basic organizational and contact details that uniquely identify your business within Helio 365.
Fields Explanation #
3.1 Organization Information #
| Field | Description |
|---|---|
| Organisation Name | Official registered name of your company or organization |
| Business Website | Your company’s website URL (optional but recommended) |
| Business Email | Official business email ID for communication |
| Business Phone | Primary contact number for the organization |
| Business Landline | Landline number (if applicable) |
3.2 Address Details #
| Field | Description |
|---|---|
| Address | Full registered office address |
| Landmark | Nearby landmark to help identify the location |
| City | City where the organization is registered |
| State | State or province |
| Country | Country of operation |
| Zip Code | Postal or ZIP code |
3.3 Organization Branding #
| Field | Description |
|---|---|
| Organization Full Logo | Upload the official full logo of your organization (used in reports, emails, and dashboards) |
| Organization Mini Logo | Upload a compact version of your logo (used in headers, menus, and icons) |
Supported file formats: PNG, JPG, SVG
Recommended: Transparent background logos
How to Upload Logos #
- Click + Choose
- Select the logo file from your system
- Ensure the image is clear and properly sized
- Upload completes instantly
Navigation #
- Click Next → at the bottom-right to proceed to Step 2
- You cannot skip this step without completing mandatory fields
4. Step 2 – Registration Details #
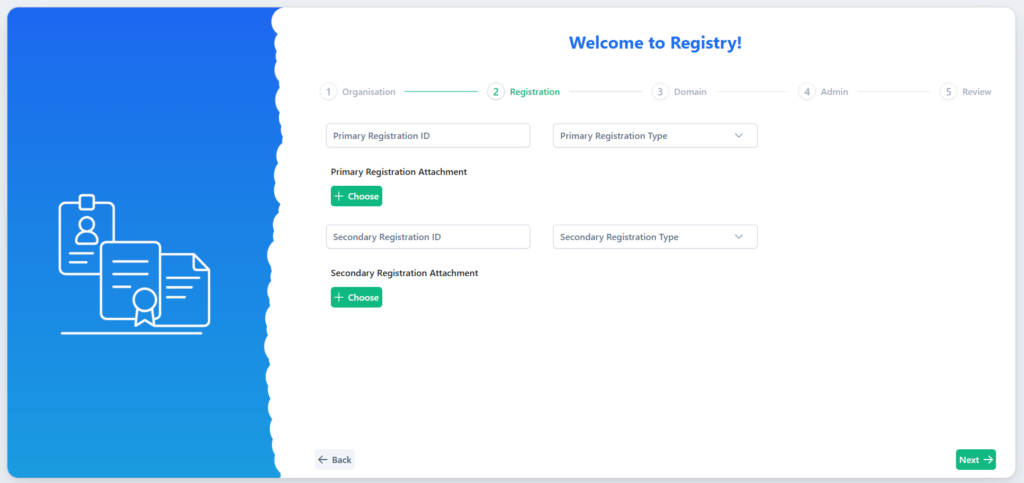
Purpose of this Step #
This step collects legal or government-issued registration details to validate your organization.
Primary Registration Details #
| Field | Description |
|---|---|
| Primary Registration ID | Main legal registration number (e.g., CIN, GST, Business Registration No.) |
| Primary Registration Type | Type of registration (selected from dropdown) |
| Primary Registration Attachment | Upload proof document related to the primary registration |
Examples of Primary Registration Types
- Company Registration
- GST / VAT
- Business License
- Incorporation Certificate
Secondary Registration Details (Optional) #
| Field | Description |
|---|---|
| Secondary Registration ID | Additional registration number, if available |
| Secondary Registration Type | Type of secondary registration |
| Secondary Registration Attachment | Supporting document upload |
ℹ️ Tip: Secondary registration is optional but recommended if your organization has multiple legal identifiers.
Uploading Registration Documents #
- Click + Choose
- Upload scanned copies or digital PDFs
- Ensure documents are:
- Clear
- Valid
- Not expired
Accepted formats: PDF, JPG, PNG
Navigation Options #
- ← Back
Returns to Organisation step if you need to edit details - Next →
Saves registration data and moves to Step 3 – Domain
5. Important Notes & Best Practices #
- Ensure all information entered is accurate and matches official records
- Uploaded documents may be verified by Helio 365
- Incorrect or mismatched details may delay account activation
- Logos and branding will reflect across the Helio 365 platform
6. What’s Next? #
After completing Step 2 – Registration, you will proceed to: